In today’s age, anyone can create a new blog from scratch in just a few hours with the help of platforms like WordPress.
The best part?
No advanced knowledge of computers or programming languages is necessary.
Blogging is an excellent way for companies to increase organic traffic to their websites via content marketing and SEO (search engine optimization). In fact, 60% of all marketers report that blogging generates demand and new sales leads.
Even if you don’t have a company or online business, you can start a personal blog simply for the love of writing and as a way to make some extra money on the side.
That all sounds amazing, but what’s the catch?
Writing a new blog post from scratch takes a ton of time, money, and effort. According to an Orbit survey, It takes a content writer an average of 3 hours and 57 minutes to write one long-form blog post, which doesn’t include the time it takes to review, edit, add images, and publish the post on WordPress.
That’s why AI writing software is growing in popularity. With an AI writer, the time it takes to complete a blog post drops from 4 hours to a few seconds.
Let AI write your blog
Generate engaging and unique articles in seconds with Copymatic. Supercharge your content production today!
If you don’t have the time or the resources to blog, don’t wait to try out the ‘write my blog for me’ feature from Copymatic. Also, stick around for our step-by-step guide on starting your blog in 2022.
Why Should You Start Blogging with AI?
There are many reasons why you might want to start a blog, even if it’s just a fun hobby for you at first.
You also don’t need to worry if you aren’t great with words, as AI writing software can now handle the nitty-gritty details of word choice, sentence structure, grammar, spelling, and more.
To start a blog, you need to conceptualize it, come up with a name, and generate blog topic ideas (more on how Copymatic can help with this process later). You’ll also need to take care of things like securing a new domain, web hosting, and promoting your blog online.
Passion is the name of the game when it comes to new bloggers. Since blogging is about sharing your knowledge and expertise with the world, you need to center your blog around a specific topic you’re passionate about.
That will make it far easier to continue brainstorming new posts as your blog continues into the future.
As far as why starting a blog is worth it, there are many benefits to blogging, including monetization opportunities, brand building, organic traffic generation, and more. Let’s take a more detailed look at each one to see if starting a blog site is a good fit for you.
Improve organic search rankings for better visibility online
Fact: 68% of online experiences begin with a search engine. That fact alone is a major reason why search engine optimization is such a big deal for every company in the modern era.
To build an audience, you want to conduct keyword research, which means digging to discover what your target audience searches for online.
That’s extremely valuable information because you can write your blog posts based on the keywords you find.
For example, if you’re in the health and wellness niche and sell hot water bottles, you may base a post around the keyword ‘hot water bottle’ because it has a high search volume and low competition.
(Hint: I used the Ahrefs keyword generator tool to uncover this information).
Targeting popular keywords will help you rank higher for them on search engines like Google, Bing, and Yahoo.
The higher you rank, the more organic traffic you’ll generate for your blog – which is your ticket to increasing your sales and developing new names for your lead email list.
A spot in Google’s top 5 or top 10 is the most desirable, as is landing a SERP feature (such as a knowledge bar or featured snippet). The competition is fierce, but if you can rank on page one, all your hard work will be worth it.
Thousands of companies and individuals write blogs specifically to boost their SEO, and it’s easy to see why. When done right, SEO ROI can equal 12.2x your marketing spend.
AI writing software is your secret weapon in this area. When you combine Copymatic’s SEO-friendly writing with a plugin like Yoast SEO, you’ll quickly figure out how to shoot to the top of the SERPs.
Be seen as a thought leader and an influencer in your field
Another primary reason so many companies blog is to establish themselves as an authority in their respective fields.
Why is this beneficial?
It is because your audience will trust you to provide answers to their questions. If you’ve achieved thought leader status, your blog will be your audience’s first stop if they run into a new pain point or need the answer to a question.
That’s one of the most reliable ways to build customer/reader loyalty.
The proof?
65% of buyers say that thought leadership content significantly changed their perception of a company for the better.
As such, thought leadership content is a great way to improve your company’s public image.
Not only that, but a strong sense of customer trust will mean they’re more likely to try out your new products and recommend them to their friends, which is a bonus.
Yet, achieving thought leadership status means that you need a content strategy specifically for it. Luckily, Copymatic has many features that can help you with this. The software can help you generate candid thought leadership blog post ideas and write the entire body of each post for you.
With a few tweaks, you’ll have five-star thought leadership content that’s ready to build a loyal base of customers for you.
Make money blogging using AI writing software
Whether you have a company or not, there are plenty of ways to monetize a blog, which is why blogging is such a popular endeavor.
For example, if you only write about your favorite types of music and TV shows in your spare time, you can still monetize your blog through Google Adsense.
Google will allow companies to place strategic banner ads on your blog geared toward your target audience, and they’ll pay you for the virtual real estate.
Advertisers will bid on your vacant ad spots, with the highest-paying bid always winning out.
What you’ll earn will depend on the competition in your niche and how high the cost-per-click (CPC) is for each ad.
Still, it’s a way to generate a little passive income from what amounts to a passion project.
Even if you run a more significant blog for your business, selling ad space on your site is still a good idea and a great way to monetize your blog.
When you combine blogging with AI software, you can fill up your website with blog posts much faster than if you hire writers – and at a fraction of the cost. All you’ll need to do is come up with the idea for your blog, and then you can use Copymatic to generate topic ideas and write blog content for you.
Make use of affiliate marketing
Another popular, low-risk way to monetize your blog is through affiliate marketing. Many major companies like Amazon have affiliate programs that are often free to join.
An affiliate program is where you promote a company’s products through your websites via special ‘affiliate links.’ A quick example would be promoting a dog whistle from Amazon through a link on your blog.
Whenever someone clicks on your link and makes a purchase, you’ll receive credit and a commission for the sale.
It’s a great business model for bloggers because you don’t have to manage any inventory or rent warehouse space to sell products online. Instead, you act as an affiliate for an existing company that handles all the nitty-gritty details of shipping products and managing warehouses.
AI writing software can help you write blog posts centered around specific affiliate links to maximize your conversions. Copymatic’s AI can write convincing calls to action, sales pitches, and value propositions that you can use to supercharge your affiliate marketing efforts.
Promote your eCommerce products
If you use the WordPress plugin WooCommerce, you can create an eCommerce store from scratch – backed up by your blog.
Blogging and eCommerce often go hand-in-hand, as a good blog will help you rank higher on search engines and generate more traffic to your store. If you can nail the blogging aspect, you’ll enjoy a continuous flow of new and returning customers to your WooCommerce shop.
But can you use automated writing software to create eCommerce copy that sells?
Yes, you definitely can, as Copymatic is capable of writing razor-sharp sales copy for any type of product under the sun. You can fully automate the blog posts for your eCommerce store to save a ton of time and ultimately make more money.
Make writer’s block a thing of the past
A huge pain point for writers everywhere is running into writer’s block.
We’ve all been there; you’re trying to get started on a blog post or a paper when suddenly, it hits you – and you draw a blank.
Writer’s block can seriously interfere with your content release schedule. If you stop blogging at least two to four times a week, you’ll begin to jeopardize search engine rankings.
Yet, writer’s block happens to the best of us unless you’re a powerful AI that has access to nearly every piece of writing ever created.
One of the most significant advantages of using AI writing software is that it never gets writer’s block. No matter what topic you outline into Copymatic, it will ALWAYS come up with rich content in seconds, completely free of plagiarism.
Even if you don’t plan on using AI to write entire posts for you, it’s still the perfect weapon to get rid of writer’s block. For instance, if you’re having trouble coming up with content for a particular section of a blog post, turn to Copymatic.
Its features, such as ‘write my blog for me,’ sentence rewriter, and ‘complete my text,’ will always give you candid ideas for new paragraphs, sentences, and entire sections. In short, you’ll never have to worry about writer’s block again.
Step #1: Conceptualizing Your Blog
Now that you know why starting a successful blog powered by AI is worth it, it’s time to learn how you can create a new blog from scratch.
You’ll have to develop a blog theme first or an overarching concept of what your blog will be about.
If you’re blogging for your company or eCommerce store, then you should already have a clear concept for your blog. Yet, if this is your first time ever starting a blog, you probably don’t know what to write about yet.
That’s to be expected, and luckily, there are plenty of places you can draw inspiration from online.
First, come up with a list of topics you’re particularly passionate about. What are your primary interests and hobbies? Do you enjoy music, or are you an expert gardener?
Selecting a topic you’re enthusiastic about will help you stay interested in your blog for many years.
Again, you don’t have to worry if you’re not a flawless writer on the subject, as the AI will quickly fill in the gaps for you. The main thing to consider here is selecting a topic that interests you and has a significant audience online.
How do you do that?
Let’s explore a few ways that you can uncover great blog topics that will generate lots of interest from a niche audience.
Explore similar blogs online and use traffic tools
Let’s say that you come up with a niche that interests you a lot, but you aren’t sure if there’s an audience for it.
A quick way to find out if there’s interest in your topic is to use a keyword research tool, like the one from Ahrefs we linked to previously.
Plug in keywords to the tool that pertain to your niche, and check out the search volume numbers. If the numbers are high (5k and above), then you know that there’s a lot of buzz surrounding the topic, which is what you want.
You can also do some quick Google searches to see if there are other blogs online discussing the topic.
If you find some, run them through a traffic checker tool, like this one from The HOTH. It will give you a detailed breakdown of their traffic numbers, which will let you know if their blog niche is worth pursuing.
Pro tip: If competing blogs are generating tons of traffic, the competition may be too steep for you. Ideally, you want to settle on a niche that interests you, has a high search volume, and low competition.
Step #2: Naming Your Blog
Now that you’ve got a niche to focus on, your blog needs an original, catchy name that your readers can easily remember.
Your blog title will also be your domain name, so you should take your time and choose wisely.
A factor that makes it a bit more tricky is that the name must be 100% original. If you select a name that an existing domain is already using, you won’t be able to use it. At the same time, it’s best to avoid using naming tricks like numbers and hyphens for SEO purposes.
So if you want to name your blog ‘The Red Tide,’ but it’s already taken, you should select a new name instead of going with something like ‘R3D Tide’ or ‘The Red T1de 31.’
Whenever choosing your own domain, you should go with a .com whenever possible. These domains are the most common and will be the easiest for your audience to remember.
We recommend coming up with many different names to try out and selecting the strongest one. You can also get secondhand opinions from friends and family to see if it’s a name they could enter into a browser from memory alone.
To come up with name ideas, you can try combining words related to your niche until something sticks out. If you’re in health and wellness, for example, you could have fun mixing words like ‘fitness’ and ‘exercise’ with other terms like ‘palace’ and ‘house.’
Two name ideas would then be Fitness Palace and Exercise House, or vice versa. Those are simple examples, but they exemplify the domain name brainstorming process.
Domain name quirks
There are a few things to note when selecting a domain name. First, there can’t be any spaces in it. So if your blog is going to be The Fitness Palace, the domain would be ‘www.thefitnesspalace.com.’
That’s important because some names can become too convoluted or hard to remember when you remove the spaces. For this reason, you should aim to come up with a domain name that’s short, sweet, and to the point.
Also, sometimes .coms are not available. If that’s the case, .net and .org are two extensions that can also work, although .com is always preferred. Yet, if you’ve selected a picture-perfect blog name and all that’s available is a .net, it’s by no means the end of the world.
Step #3: Selecting a Hosting Company and Hosting Plan
By now, you’ve got an overarching concept and a catchy domain name. Now you just need two more things, and you’ll be ready to go live with your blog.
You’ll need:
A web hosting plan to host your blog
Software to build your blog (WordPress)
As far as web hosting goes, you’ll have plenty of options. Popular hosting providers for blogs include:
BlueHost
HostGator
GoDaddy
Hostinger
If you’re going to use WordPress (which we recommend), your best bet is to use BlueHost – as they offer a free installation of the WordPress software.
Also, if you purchase an annual or two-year plan from WordPress, you get to register your custom domain name for free for an entire year. That will save you the upfront cost of paying for 12 months of a domain.
Once you sign up for a BlueHost plan, you’ll see a blue ‘WordPress’ button in the top right-hand corner. Click on it to start the automatic installation and create a WordPress account. With both hosting and a blogging platform, you’re almost ready to go live and begin automating blog posts.
Before you do that, though, you need to familiarize yourself with WordPress so you can design a beautiful, functional blog.
Step #4: Get Used to the WordPress Blog Editor
Now it’s time to don a designer’s hat and decide how you want your blog to look.
No graphic design skills are necessary here, as WordPress uses an intuitive drag-and-drop editor that anyone can get used to.
There are also thousands of blog templates available that you can use as a jumping-off point. What most new bloggers do is select a template theme and then tweak it so that it becomes original.
A huge benefit of using WordPress is that it’s free to use and has hundreds of helpful plugins that make designing a blog as straightforward as possible.
Once the BlueHost setup is finished, you’ll gain access to the WordPress dashboard. There’s lots of useful information here, including:
Your current version of WordPress
WordPress Updates (toggle on and off automatic updates)
Flush Cache (clear your cache to improve running speed)
SSL Certificate Setup (crucial for maintaining a secure blog)
The option to install a ‘clean version’ of WordPress (in case your version gets corrupted or you run into issues)
There’s a lot to unpack here, but for now, we’ll focus on how to find template themes so you can start designing your blog to look the way you want it.
Finding and selecting a WordPress blog theme
To view WordPress blog themes, you’ll need to log into your WordPress admin first.
What’s that?
It’s essentially your central command center for everything related to your website. This is where you can create new blog posts, browse themes, use plugins, and more.
To get to your WordPress admin, type in your domain (i.e., www.thefitnesspalace.com), plus ‘wp-admin.’
For our example, it would look like this ‘www.thefitnesspalace.com/wp-admin.’
That will take you to a login screen where you’ll need to enter your WordPress credentials. From there, you’ll get to view the WordPress admin dashboard.
The admin dashboard may seem a tad overwhelming at first, but it’s pretty straightforward and ends up being quite easy for most to learn.
For now, go to the Appearance menu in the sidebar and select Themes from the submenu that appears.
Here, you’ll get to see the handful of themes that come with WordPress by default.
These are pretty basic, though, and you’ll probably want something more robust and eye-grabbing.
To access thousands of custom WordPress blog themes, click the ‘Add New’ button at the top of the page. It’s right next to Themes if you’re having trouble finding it.
Using filters to narrow down the results
You’ll be greeted by literally thousands of themes to choose from, which is obviously a little daunting.
Luckily, WordPress has a few intuitive filters you can use to find a blog theme that suits your needs quickly.
The filters include:
Most popular
Saved favorites
Featured
Featured Filter
The Featured Filter options contain three filters within it:
Layout
Features
Subject
If you’re looking for a specific visual theme, you’ll want to use the layout filter.
If you’d rather find a template that’s suited for the main topic of your blog (i.e., the products you sell or a specific niche), you should use the subject filter.
Do you have certain features that you need to be included on your blog, such as custom headers and featured images? If so, then the features filter is for you.
These filters will help you uncover highly specific WordPress themes that contain all the bells and whistles you want. In a sense, filters are your special tool for selecting a needle out of a haystack.
Selecting and installing a theme for your blog
There are thousands of amazing filters you can use for free on WordPress. Yet, if you can’t find one that clicks with you, you have other options.
Plenty of premium themes are available online through websites like Themeforest.
Talented WordPress experts create high-quality themes that they put up for sale each day, often containing robust features that you won’t find anywhere else. Paying for a theme has additional benefits, such as access to round-the-clock support, increased flexibility in customization, and automatic updates.
Whatever you decide, you’ll need to install and then activate the theme for it to show up on your blog. Once you’ve got an active theme for your blog, you’re ready to start customizing and optimizing it for SEO.
Step #5: Customizing Your Blog and Optimizing It for SEO
Now that you’ve got the theme of your choosing set up, you need to customize it until the original theme becomes unrecognizable.
Remember, the point of installing a theme is to use it as a starting point, not leave it in its original state.
Using a default theme looks lazy and is often easy for users to catch.
For example, Extra is the most popular blog template on WordPress. As such, thousands of blogs online use it as their default blog design, some with little to no changes at all.
So if your blog uses an unchanged Extra theme, many users will quickly notice. Not only that, but they’ll probably grow bored with your layout and leave.
For a blog to succeed and consistently generate traffic, it needs a wholly original theme that’s visually appealing and easy to navigate.
That means you’ll need to spend some time customizing your theme until it stops resembling a template and starts resembling your brand. You can choose thousands of customization options for your blog, and we won’t be covering them all.
Instead, we’ll provide a quick overview of the basics, so you can get a simple yet pleasing navigational layout going.
Creating a navigation menu
Go back to the Appearance tab on the left sidebar, but this time select Menus.
This is how you will create the man navigation bar for your blog. Under the menu name, type in ‘Main navigation bar,’ and click ‘Create Menu.’
You’ll see a section called Menu Structure. This is where you will drag and drop the menu items you want to include in your navigation bar.
The column on the left will have the various pages from your blog that you can drag over to the menu structure section. It’s an intuitive and easy way to build a navigation bar. Items that you’ll likely want to include are:
Your homepage
About Page
Contact Page
A link to your online store if you have one
Any other pages that you want to include
You’ll get the chance to customize the anchor text for each link as well. After entering the domain for each page, you can enter custom text under ‘Link Text.’
For example, while your homepage URL may look like this:
‘www.thefitnesspalalce.com/home’
That’s too long and cumbersome to include in a navigation menu. So under Link Text, you can enter something concise like ‘Home’ or ‘Homepage.’
Customizing your blog’s appearance
Now it’s time to give your blog a fresh coat of paint and make it indistinguishable from the WordPress theme you chose.
You’ll have complete control over every aspect of the design of your blog, including:
Colors
Fonts
Sizes
Images
Widgets
Social media buttons
Headers
Do you have branded colors/fonts that you use outside of your blog? If so, now is the time to add them so that you stay consistent.
While it’s up to you to decide how you want your blog to look, keep your readers in mind during the design process. If your color scheme is too loud, it can deter and distract from the content on your blog, which isn’t good.
In general, it’s best to avoid text color/background color clashes like yellow text on a red background. Do your best to make sure that the text on your blog looks clean and isn’t challenging to read due to colors or images in the way.
Optimizing your blog for technical SEO factors
By now, you should have a functioning blog with a visually appealing layout and navigational structure.
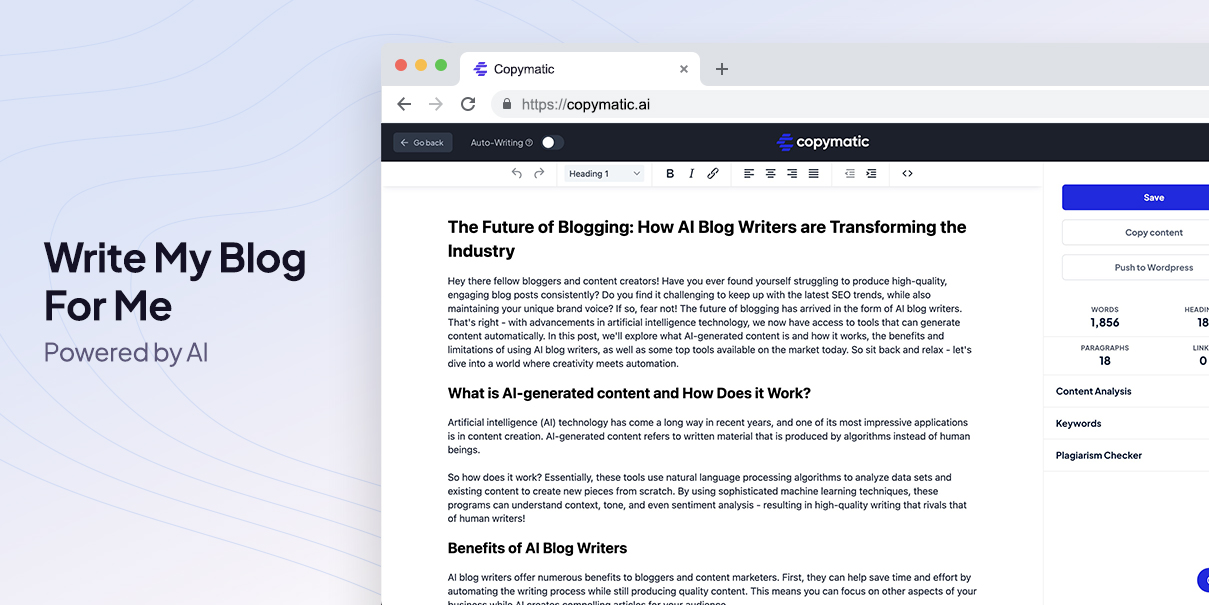
We’re getting close now, but there are still a few things you need to do before you put Copymatic’s AI ‘write my blog for me’ software to the test.
Namely, you need to set up your blog so that it’s as SEO-friendly as possible. You’ll thank yourself for this later, as your blog will already be set up to rank on search engines by the tie you publish your first post.
The first thing you should do is download a helpful SEO plugin called Yoast.
To find it, go to Plugins on the left sidebar of the admin dashboard, and click on Add New. In the search bar, enter ‘Yoast SEO.’ Hit Install Now and then Activate to begin using the plugin.
You should now see the Yoast logo at the top of your WordPress admin dashboard (a Y with an exclamation point next to it).
Using Yoast SEO
You’ll want to set up a few things in the plugin before you start creating posts. First, you need to verify that all the information for your blog is correct.
To do so, click on the Yoast logo at the top of the admin dashboard. Once there, navigate to the Your Info tab, and verify that your blog name and tagline are the way you want them. Next, you’ll need to identify yourself as either a company or an individual. Once you’re done, hit ‘Save Changes,’ and you can move on.
You’ll also want to sync Google Search Console (GSC) with Yoast to give you the most accurate SEO metrics.
If you haven’t already submitted your sitemap to GSC, create an account and do so now.
Select the Webmaster Tools tab that’s next to Your Info. From there, click on Google Search Console.
Here, you’ll get asked to sign in to your Google account. Once you’re in, click on ‘Alternative Methods’ under Webmaster Central. Once there, click on ‘HTML tag.’
You’ll receive a tag that you can copy and paste into Yoast under the Google Search Console section. Once that’s done, hit ‘Verify,’ and your GSC will be synced with your blog. You can now access Webmaster Central from GSC through Yoast, which will provide lots of valuable SEO insights, including:
Key phrases you can rank for
Technical SEO errors on your blog
The ability to notify Google whenever you make a new post
These features will all come in handy whenever you’re posting and publishing new content.
Yoast’s Installation Wizard
Lastly, you need to run the installation wizard for Yoast, as it will provide additional steps for SEO optimization.
From Yoasts’ dashboard, go to the General tab, and select Installation Wizard. What follows are a series of 10-steps meant to optimize your blog for search engines. Step 1 is a welcome screen that provides a basic overview of the process.
Step two is called Environment, and it refers to which type of web environment you think best suits your blog. Here are the options you can choose:
Production (a live site that draws real traffic)
Staging (a copy of a site used for testing purposes)
Development (a local site used for developers)
For most of you, you’ll want to select Production, as we’re creating a live blog to generate organic visitors.
Next up is Site Type, which will be Blog (don’t worry about the other options).
Step four determines if you’re a company or an individual, and step five lets you add all the social profiles associated with your account. Step six is all about the visibility of your posts. Unless you want anything to stay hidden, select each post type to remain visible.
Step seven will ask you if there are multiple authors for your blog, and step eight asks if you want to sync GSC data (we already did that).
Lastly, step nine lets you customize your title, and step ten congratulates you for completing the wizard.
Yoast is now set up and ready to optimize your WordPress site and blog posts for SEO.
Step #6: Use AI to Brainstorm Topics for Your First Blog Posts
All right, now you’ve got a fully customized and optimized blog that’s ready to go live and take over the world.
Before you start your first post, you’ll need to come up with a relevant topic to write about.
This is where it helps to be passionate about what you blog about.
Going with the Fitness Palace example, if you work out regularly, it will be much easier to develop blog topics.
For instance, if you have a particular workout plan that’s provided outstanding results for you, why not share it with the world? You could also blog about workouts that you’ve tried that DIDN’T work and that you feel your audience should avoid.
Of course, you should always combine your passion with keyword research. Ahrefs tool that we linked to before works wonders in this regard. Plugging some topic ideas into the keyword generator will let you know if there’s ample interest surrounding them.
Don’t settle for just one keyword, either.
After all, you don’t plan on only releasing one post and calling it quits. Instead, blogging is a long-term game, so aim to develop ten or more target keywords from your research session.
Solving user pain points with blog posts
A common and effective way to come up with blog ideas that generate traffic is to focus on a pain point within your niche.
If you can solve a prevalent problem in your field, your audience is sure to flock to your free blog post to learn how to fix it. Along the way, you can hit them with convincing call-out boxes and calls-to-action if your goal is to promote products.
Once again, this is where it helps to be passionate about your blog topic.
If you know a lot about fitness, you probably have pain points of your own that you’ve solved in the past.
You can also look to the web to uncover pain points in your industry. Facebook Groups and Redditt boards are great places to start. Check out what users complain about in r/fitness, and see if you can provide a solution through your blog.
Copymatic’s tools for generating ideas and blog outlines
Can AI help you select a topic for your next blog post if you’re drawing a big blank?
The answer is yes.
Copymatic has two features that can help you generate topic ideas and complete outlines for your first blog post – the Blog Ideas and Blog Outline tools.
When using the Blog Ideas tool, you must enter a keyword or short phrase related to your niche.
As an example, we entered ‘fitness’ into the tool to keep in line with the Fitness Palace blog. Here’s what the tool generated for us in seconds:
5 Great New Exercises to Try
Fitness Tips: How to Live a Healthy Life
10 Ways to Be More Active
The Truth About Fitness
These are all excellent blog ideas to try out – and can help you get your creative juices flowing if you’re in a rut.
Let’s say that you don’t care for any of the topics you see above. In that case, simply hit the ‘Generate More’ button, and the AI will create more on the spot.
You can also control how many results you want to see each time. The default is four, but you can crank it up to 8 if you want a lot of topics to consider.
For the purposes of this blog, we’ll settle on ‘5 Great New Exercises to Try’ as our model post. Now that we’ve got an idea let’s pop it into the Blog Outline tool to flesh it out more.
The Blog Outline tool
To generate an outline, you need to provide the title of your blog and a few short phrases of what you want.
The AI will take care of the rest from there, and you’ll have a detailed outline ready within seconds.
We put in ‘5 Great New Exercises to Try’’ and described it as ‘an article covering five new exercises that provide great workouts.’
Here’s what Copymatic drummed up for us:
The Pendulum Swing
The Fire Hydrant
The Yoga Wheel
Warrior III Pose
The Push-Up and Pull-Up Combo
As you can see, the AI scoured the web and found five excellent exercises for readers to try – and we didn’t have to do a thing.
Just like the Blog Ideas tool, you can hit Generate More if you aren’t happy with the outline. Copymatic will continue to generate more exercises and header options until you find the perfect one.
Step #7: Use AI Writing Software to Write Your Blog Posts
Now that you’ve got a functional blog that’s optimized for SEO as well as blog ideas, keywords, and outlines – it’s time to start getting content out there.
This is where AI writing software like Copymatic truly shines.
You can create long-form blog posts at the click of a button, with the ability to fully edit and customize the results to your liking.
Head over to the Blog Writer (write my blog for me) tool to get started.
Using the Blog Writer tool
Copymatic is intuitive, so the details from our fitness article outline carried over into the write my blog for me editor. You also have the option to include a target keyword, which you always should for SEO purposes.
Once the details are set, hit next to go to the Title Generator tab. Here, you have the option of getting Copymatic to generate titles for you, or you can choose to write your own instead.
Let’s generate a title and see what the AI comes up with:
5 New Exercises That Provide Great Workouts
Perfect, it starts with a number (indicating to search engines that it’s a listicle), and it lets the reader know what’s in it for them (a great workout).
The Intro Generator tab works just like the Title Generator in that you have the option to write your own if you don’t want Copymatic to write it for you.
Here’s what Copymatic wrote for us:
If you’re looking for some new ways to work out and don’t want to do the same old routines, then you should check out this article for some exercises that are great for building a strong body.
Here we have a concise intro that was put together within seconds.
What’s excellent about Copymatic is that you can mix and match AI writing with your own so your posts are in line with your branding, personality, and style.
Instead of letting Copymatic write the entire thing (which is certainly acceptable), you can go for a hybrid between your writing and the AIs.
That way, if you get stuck on a paragraph or can’t think of an outro, Copymatic will fill in the gaps within seconds.
What else can Copymatic write?
Besides short-form and long-form blog posts, Copymatic can write all sorts of content. That includes:
- Website copy and SEO
. Copymatic has tools for everything from landing pages to meta descriptions and more. Quickly and easily handle the copywriting and SEO sides of your website.
- Social media and ads
. If you don’t want to spend time manually writing social media posts, Copymatic’s AI can handle them for you. It can write YouTube video descriptions, Instagram captions, and Quora answers.
- Marketing
. With Copymatic, you’ll never have to write another product description, press release, or value proposition again.
- Other tools
. You can also rewrite sentences, check grammar, write eCommerce product descriptions, and more in the ‘other tools’ section of Copymatic.
Whether you’re writing a blog or a cold email to a new client, Copymatic has tools for it all.
In Summary: Write My Blog for Me
By now, you should know how to create a blog from scratch and populate it with AI-written posts.
You should also know how to use WordPress, Yoast SEO, and Google Search Console.
Using Copymatic in tandem with these tools and your own passion is the most reliable way to find success with blogging in 2022. Thanks to AI, you won’t have to waste time or money writing blogs or hiring writers.
Don’t just take our word for it; you can easily begin Copymatic’s free trial with the click of a button with no obligation on your part, so don’t wait to try it out now.